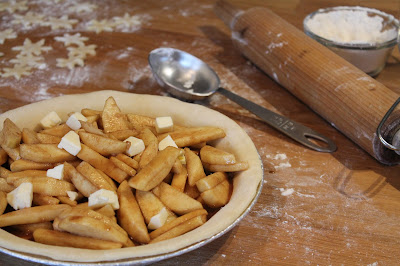
Holiday baking season is in full swing, and I love every minute of it. I remember my mom baking a storm this time of year and the sound of her mix master going at top speed. For me, it wouldn't be Christmas without homemade sweets.
I started fiddling around with this apple pie recipe in this fall when apples came into season. I'd come across a new food trend of making elaborate pie designs using cut outs of dough and wanted to try it. Some people use cookie cutters to achieve their desired design, and some actually hand cut out their designs with a paring knife, amazing! I love this new trend and even though it does take some extra time, it appeals to my creative side. I've done a relatively simple design on this pie using star shaped cookie cutters, but I've seen many stunning designs that get really in depth. Everything from geometric shapes to layering cut outs of dough over the filling to create a top crust that's super eye catching and impressive looking. Doing a google search of "fancy pies" will bring up a ton of images.
Of course, if you don't have the time or inclination to try out some sort of decoration, the pie crust recipe below will create a traditional pie too. I often use pate brisee a recipe from the book "Pastry" by Michel Roux for most of my pies (here's the recipe from another of my posts). However, I wanted a dough that would be able to withstand being handled somewhat, wouldn't fall apart and would hold the shape after baking. I came across the dough recipe through a pie club that I belong to (and yes, I know how nerdy that sounds). A fellow food blogger by the name of Karin, came up with a recipe that works so beautifully for decorating, but doesn't compromise on taste. Check out her blog for the recipe.
As for the filling, I came up with this filling after trying many, many different recipes that pretty much turned out far too watery/runny for my tastes. I wanted a filling in which the apples are tender but also not too mushy like apple sauce. As well, I wanted the juices that come out of the apples to thicken up to a nice glossy and relatively thick consistency. I've figured out that letting the apples macerate in the sugar for an hour or so draws out most of their fluid. Then I add more thickener than most recipes I've come across call for, which ensures a nice glossy and perfectly thickened sauce. Something I've learnt about pie making is that it's best to use ratios for pie filling - 25% sugar to fruit and 5.5% thickener to fruit. Of course this requires having a kitchen scale to figure these ratios out. Thus, I've found using 5 or 6 regular sized apples with the amount of sugar and thickener I've specified below, works well. As well, using corn starch as a thickener in pies works great for me, it's easy to find and inexpensive I know a lot of hard core pie bakers prefer tapioca starch or arrowroot, but I find corn starch works just as good.
Apple Pie Recipe:
For crust, I recommend using this recipe as mentioned above.
Filling:
5 or 6 apples peeled and cored (use any variety you like, I used Royal Gala in my pie)
1/2 cup light brown sugar
1/2 cup granulated white sugar
1 tablespoon of cinnamon
Pinch of salt
1/4 cup of corn starch (sift)
Peel core and chop apples into slices and place in a medium sized mixing bowl. Add the sugars, cinnamon and salt to the apples and mix, coating the applies with the cinnamon mixture.
Cover with plastic wrap and let sit for 1 to 2 hours and the apples have let off their juices (there should be about 1 to 1.5 cups of liquid).
While the apples are macerating, make the pastry and ready for the pie plate. This is when you'd also want to make whatever decorations you wish (or not if you going to make a traditional pie crust). Set aside.
Preheat oven to 350 degrees F.
Add the cornstarch to the apple mixture after it's been sitting (I sift the cornstarch into the mixing bowl of apples to ensure a nice smooth glossy filling after baked). Mix well and then pour apples into the prepared pie plate and add a few small pieces of butter to help the filling thicken further while baking. Prepare pie crust as you wish, by decorating with various shapes and cut outs or make pie in the traditional style.
Bake pie in the oven for 35 to 45 minutes or until the crust is lightly browned and the filling is bubbling. Allow to cool slightly and serve with whipped cream or vanilla ice cream.
Bon Appetit!


No comments:
Post a Comment
Thanks for taking the time to comment! I look forward to reading your thoughts and feedback. Take care.